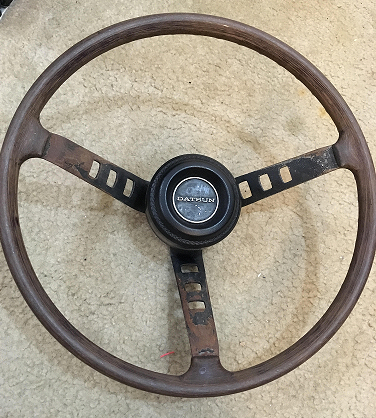
The 240Z featured a beautiful ‘faux-wood’ steering wheel that some are fooled into thinking is actual wood. Some claim it is a composite material of wood and plastic but it is certainly not 100% wood, but the bottom line is that it is actually quite easy to refurbish. Although these steering wheels hold up very well and often give the cockpit a bit of a ‘patina’ look, they are actually very easy to restore to look like they’re brand new and we’ll show you how to do so in this guide. Or, if you’d prefer to just touch up the wheel slightly so as to not make the rest of your interior look dated by comparison, this guide will talk about how to do that as well.
Some of the links on ZCarGuide page may be affiliate links, meaning I receive a commission (at no extra cost to you) if you click on the link and make a purchase. I only recommend products I’ve used and trust unless stated otherwise.
Materials Required
- Masking tape
- Some newspaper and cardboard
- SOS Soap Pads
- 320-grit Wetordry Sandpaper
- Extra-fine steel wool
- Minwax Helmsman Spar Urethane
- Flat black paint
- Semi-gloss clear
- Sandable primer
Tools Required
Generally the wear and tear you’ll notice on your 40+ year old steering wheel will show up in the form of a faded rim, or paint fading and chipping off of the spokes of the wheel itself. The overall approach to restoring your steering wheel fully involves separating the restoration of the rim and the spokes. First though, we’ll discuss how to actually remove the steering wheel from your 240Z.
Removing and Preparing the Steering Wheel
To begin, remove the ‘Datsun’ branded horn pad. Even if you haven’t had your Z for long, you’ll likely already know how to do this — as it’s probably fallen off on you while driving before! Simply pull it back and it should come right out. Many 240Zs are actually missing this part, but you can buy a new one at ZCarDepot.
Next, you’ll see a central 22mm nut which you might need some leverage to remove. After removing that, remove the two screws which hold the horn button contact plate down. After that, apply equal pressure all around the steering wheel (you may need to tap on the rim with your palm) and pull it straight off of the column.
With the steering wheel removed, you’ll want to mask off the hole that the wheel attaches to the column. This is because when cleaning the wheel, you don’t want any dirt, grime, or any kind of residue getting down into that hole. It probably wouldn’t be a disaster, but masking the the hole off is a smart precaution to take. Next, take a couple pieces of cardboard and poke holes in them to rest the two pins on the underside of the wheel into. This will allow you to rest the steering wheel down on a flat surface so that it sits upright and you can apply pressure when sanding without worrying about breaking those pins.
More Prep…

First, we’re going to focus on clearing off the rim of the wheel. Take your SOS soap pads and a bucket of water and begin working your way around the rim with it. Don’t be afraid to use a lot of water, as the water will also let you know how you’re doing — once you notice that there isn’t any orange or brown color coming off the wheel during this process, move to another part of the wheel. It really doesn’t take all that much to do a good job here, just be thorough. If you’d like, you can go over the rim with some steel wool to even out the surface.
Now, we’re going to prep the spokes. Take your 320-grit Wetordry sandpaper and a new bucket of water, and begin to sand down the old spokes’ finish. You can be as thorough as you’d like during this process — you can just evenly smooth out the surfaces enough to put some new paint down, or you can fully remove the old paint, ending with some more fine sandpaper such as 220-grit. You may also choose, for example, to not really bother much with the backside of the spokes. This definitely affects how the new paint will look, but it’s up to you how nice you’d like it to be in the end.
If you’ve gone down to the metal at any point of the spokes, you’ll want to finish with your very fine steel wool. Go over every area and test with your finger to ensure it feels smooth. With that done, take your masking tape and newspaper and mask off the spokes. You’ll be spraying the rim in the next steps, so it is worth spending the extra effort to carefully mask the particular corners where the spokes meet the rim.
Refinishing
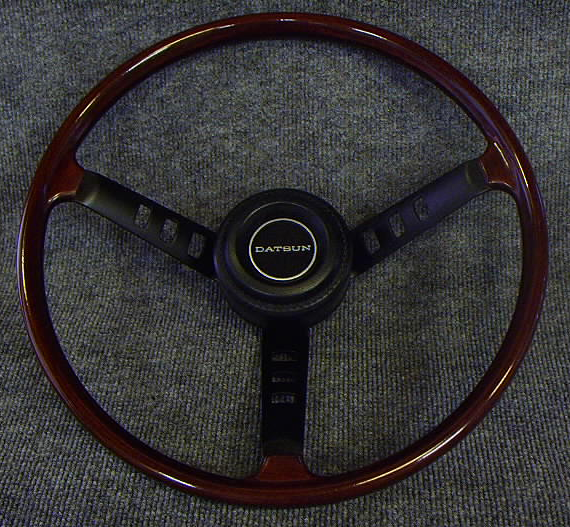
With the spokes masked off, you’re ready to spray down the rim with the urethane. Use several light coats and take your time to ensure even application. Between coats, you can take your (extra fine) steel wool to smooth out the previous application. Once you’re satisfied, ensure you leave the steering wheel enough time to dry. It may take leaving it overnight or even for a couple nights, but you don’t want to move on without ensuring the lacquer has dried completely. Note that you may want to add a Red Mahogany stain of some kind before applying the urethane. However, if you do a good enough job cleaning the rim, urethane alone should be enough at bringing back the original color and shine of the wood composite.
Once fully dried, you can remove the masking from the spokes, and then mask off the rim. Also mask off the central hub. Hang the wheel on something so you can access both sides easily. If nothing else, you can just use a wire-hanger for this. Simply spray the spokes lightly with primer, lightly sand the primer, then move on to the flat black, and finish with the semi-gloss clear.
After you let the spokes dry and remove the masking, you should have a very new looking steering wheel! If you’d like to go the extra mile, you can use polishing compound and buff the wheel to achieve a glossy shining finish.