The Datsun/Nissan L-series is one of the most reliable series engines the 1970’s gave us, and has rightly become an icon in Japanese-American automotive history. The L-series was produced from 1967 to 1986 featuring both inline-four and inline-six cylinder variations. The L-series spanned a wide displacement range of 1.3L to 2.8L. The L-series powered Datsuns from the everyday 510, to Datsun’s most notable success in the American market, the Z car. Starting with the L24, L-series engines propelled the 240Z into the hands of automotive enthusiasts around the world and helped Datsun create an image as a formidable automaker in a time when Japanese imports were considered laughable. In its nearly 20 year history, the L-series engine succeeded due to its dependability and ease of repair.
Some of the links on ZCarGuide page may be affiliate links, meaning I receive a commission (at no extra cost to you) if you click on the link and make a purchase. I only recommend products I’ve used and trust unless stated otherwise.
With that said, whether you have a 240Z, 260Z, 280Z, or later Z-car, tuning your L-series engine is a necessary task. These engines are now almost 50 years old and while they are as impressive as ever, it is necessary to get every last bit of horsepower and torque your L24, L26, L28 or onwards can produce.
To produce this guide, I worked with my friend Min who runs a great YouTube channel called Restoration for Beginners. He’s restoring a 280Z and is an amazing mechanic, and better yet, he posts videos every week on how you can do the same so be sure to like and subscribe to Min’s videos if you find them useful! I’ve embedded some of hiss video on tuning your L-series engine within this artcile and they are the perfect companion to this tutorial on ZCarGuide. Below you’ll see the checklist of 10 areas you should focus on when tuning-up your Z-car.
Testing and Tune-Up Procedure
- Bolt retorquing
- Valvetrain check
- Ignition system check
- Check and replace all fluids
- Cooling system test
Don’t worry if you’re not sure where to go from just reading this checklist. We’re going to go through all of these processes in detail. Before you get started, do a quick visual check of your entire Z. You’re going to want to look for things like fluid leaks, damaged hoses, disconnected wires, etc. There is no perfect way to do this, but it is a good idea to be meticulous about it and try to gather as much knowledge as possible before you start testing and tuning. This way, the “lightbulb” might go off when you run into something in your testing that doesn’t quite make sense.
1. Retorquing Bolts
Retorquing your cylinder head and manifold bolts is an essential process in tuning your Z. Datsun recommended that the cylinder head bolts be retorqued every 12,000 miles on an S30, except for the first time you retorque the bolts, which should be done after the first 600-1,000 miles. However, if you somehow have an S30 with 600-1,000 miles, I’d like to buy it from you. This is an essential process as loose head bolts can blow your head gasket, while loose manifold bolts can cause vacuum and exhaust leaks. These are all critical issues if they arise, and these bolts naturally come loose over periods of regular operation.
Your first goal is to remove the valve cover. To do this, unplug the spark plug wires. Many distributors make it easy to plug the wires back into the correct order when reinstalling, but if you are uncertain, make sure to label the wires so you can match them to the correct position when reinstalling. Next, remove the vacuum hose on top of the cylinder. There may be a small flame arrestor inside. Next, remove the 10mm. valve cover bolts. Order of removal does not matter.
With the valve cover removed, remove the head gasket and inspect it. You may want to replace the valve cover gasket at this stage. Fortunately it is easy to replace the valve cover gasket at another point if you decide not to, but it in’t a bad idea if you’re already there now. Replacement head gaskets can be found online cheaply such as this one on Amazon. The added benefit of ordering from Amazon over traditional online auto parts stores is free shipping through Prime!
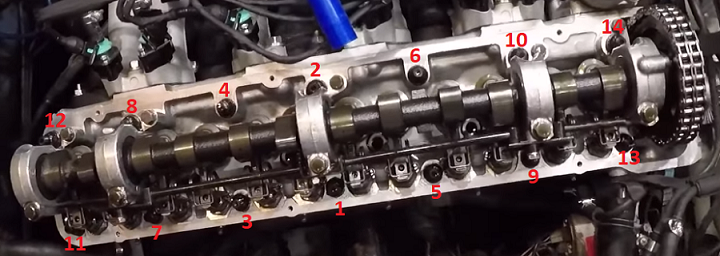
Next, grab your torque wrench. The torque wrench does not need to be specialized, you can use a standard torque wrench such as this one and it will do fine. If you were first installing your head, the factory recommends you retorque in 3 stages: 29 ft.-lbs., 40 ft.-lbs., and finally 60 ft.-lbs. However, since we’re just retorquing the bolts, you can skip steps 1 and 2 and just set your torque wrench to 60 ft.-lbs. The most important thing to remember when retorquing your head bolts is to ensure you are doing so in order. There are 14 bolts and the suggested sequence is to work inside-out. See the image below for the correct torquing order:
Next, you’ll be retorquing your intake manifold bolts. There are four of them on top of the intake manifold that you need to check. You will need a 14mm socket and likely a few different joints and extensions to actually get a solid grip on them. While using these attachments is not necessarily a good idea when doing something as precise as bolt torquing, they are simply impossible to access without them in some situations, and fortunately this process does not need to be 100% exact. These bolts should be torqued anywhere from 25-36 ft.-lbs.
After that, you can torque your exhause manifold bolts which are even more difficult to get to. These bolts should be torqued anywhere from 10-13 ft.-lbs.
2. Valvetrain check
Three major components of inspecting your valvetrain are to (1) make sure the valve timing is still correct, (2) inspecting and measuring valve lobes, and (3) adjusting the valve lash. For these processes, I would highly recommend you check out Restoration for Beginners video tutorials which perfectly show this entire process. There are a lot of intricate details which need to be shown visually, so instead of reinventing the wheel, I’ve just embedded the videos below:
Compression testing
While compression testing doesn’t necessarily fall under the umbrella of the valvetrain check, now is a great time to do a compression test. This is because a compression test can be a great indicator of whether or not your valvetrain testing and adjustments were correct. An engine with inadequate compression will be an immediate sign that you need to go back and make sure your valves or perhaps piston rings are installed and adjusted properly. While this job may seem daunting to a beginner, it is actually quite a routine process.
For this step, you’re going to need a compression test kit like this one from Amazon, or you can check out our list of best compression testers. It is also recommended that you pick up an inexpensive remote starter. You can do this without the remote starter, but it is highly recommended that you do buy one so that you do not have to disable the fuel system. Also, if you’re doing this solo, you would need to get into the car to crank the engine each time, which is not recommended as you should be going through each piston quickly so that they are all tested at a relatively similar temperature.
Compression testing should always be done with the engine warm, so fire up your Z and let it idle for a few minutes to get the engine warmed up. With the key completely out of the ignition, remove all spark plug wires and then spark plugs themselves, and then take out the ignition wire that goes to the ignition coil. Go to the starter in your engine and remove the positive lead. Take your remote starter and connect one end to that positive terminal of your starter. Connect the other end to the positive lead of your battery. At this stage, check that the remote starter works. As in, pull the trigger and verify that your engine is actually cranking.
Grab a notepad and your compression test kit and connect it to piston 1 (or whichever piston you’d like to check first). At each piston, make sure you write down what reading you come up with. To actually insert the tester, you may need to pick out the correct fitting from your compression test kit so that it fits into your spark plug hole. However, you don’t need to tightly screw it in to the spark plug hole, just make sure it’s snug.
For all S30s (240Z, 260Z, and 280Z) you should be looking for a reading that falls within 171-185 psi. with the SU carburetor setup. If you receive satisfactory readings from each cylinder, congratulations — you’re done! However, you might not be so lucky. If you are not satisfied with your compression test readings, it could be one of the following:
- Worn-out piston rings – If you suspect worn piston rings, you’re going to want to do a “wet compression test”. This is essentially the same process as described above, except you’re going to squirt in a bit of engine oil into the cylinder chamber before you test that cylinder. If you originally had low readings and find that a wet compression test gets you closer to the norm, that will indicate that your piston rings are likely worn and should be replaced.
- Delayed valve timing OR out of spec valve lash – If performing a wet compression test does not impact your results, your issue is likely one of these. Go back and recheck.
- Blown head gasket – If you see low compression readings in two adjacent cylinders, it is likely that you have a blown head gasket. Of course, there are many other signs of a blown head gasket, but this is one quick check you can do. Another indication is if your exhaust produces excessive white smoke.
- Excessive carbon build-up – You should be able to see this on your cylinders. If you feel that this might be your issue, try running some Seafom through your engine to see if it fixes the issue.
3. Ignition system check
 For starters, grab your multimeter and verify that your battery is getting at least 12.5V. This is imperative at this step, as checking your ignition system with a dead battery will not yield any useful information. Next up, we want to check that the alternator is charging enough (not too much, not too little!) Start the engine and while your Z is running, go back and check the voltage of your battery again. This time, you’re looking for a reading of 13.5V-14.5V. Anything above 14.5V indicates that your alternator is charging too quickly, and anything under 13.5V means that the alternator may not be charging fast enough.
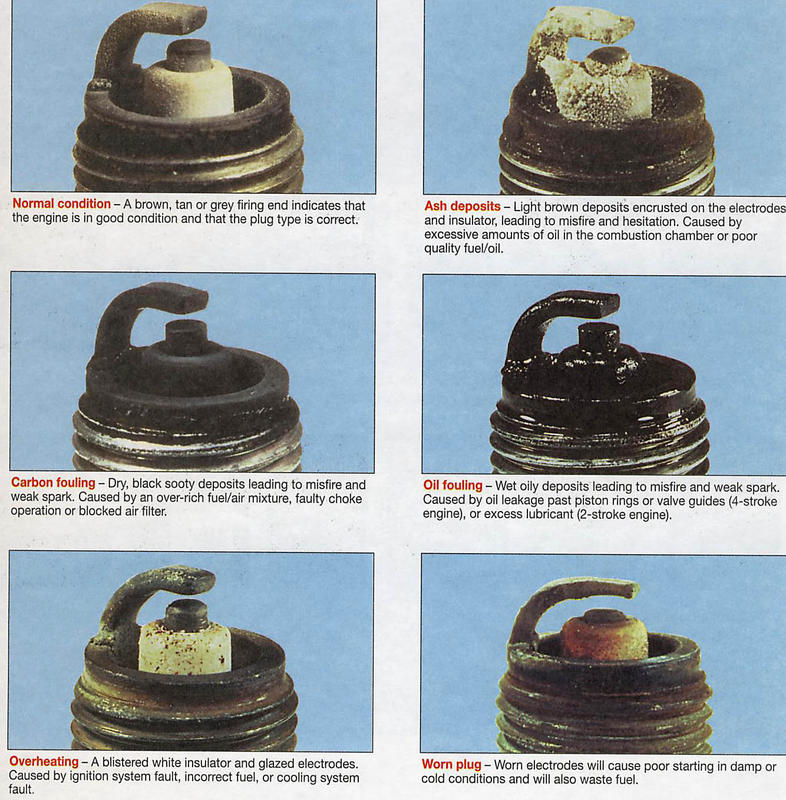
Next, you’ll want to check out the spark plugs. Remove all spark plug wires and spark plugs. Spark plugs can tell you a lot about how your engine is running. With all the plugs lined up next to each other, visually inspect them keeping an eye out for any of the conditions shown to the right here (or above, if you’re using a mobile device).
Next, inspect the spark plug gaps. If you’re unfamiliar with this process, check out our spark plug replacement guide. Below you’ll find the table of acceptable spark plug gaps. You may find that some plugs do not look all that worn or in need of replacement, but in general it is always a good idea to replace all 6 at once with brand new plugs. If you choose to use anti-seize, be careful not to apply too much. Lightly oiling the threads should be enough though. Torque the plugs to 11-15 ft. lbs.
| Model | Spark Plug Gap (Range) |
| 240Z | 0.8mm-0.9mm, 0.031-0.035in |
| 260Z | 0.8mm-0.9mm, 0.031-0.035in |
| 280Z | 1.0mm-1.1mm, 0.039-0.043in |
Next, you’ll want to verify that you’re getting a spark at each cylinder. For this process, you’ll need an ignition tester. I understand that this guide does seem like it requires a lot of specialized tools, but most of them are fairly inexpensive and they are absolute necessities if you plan to work on your engine yourself. Again, you’re going to be going through this process for each cylinder, one by one. Start at cylinder 1 and remove the spark plug wire. Take your ignition tester and plug the indicator end (the metal part!) to the spark plug boot, and the other end back into the spark plug hole. Start up your engine and check out the indicator light. You’ll want to verify that the indicator light is blinking constantly. Repeat this process for all six cylinders to verify that you’re getting spark to each cylinder.
If you’re not getting spark at any cylinder, this is certainly a problem you’ll want to remedy. If just one or some of your cylinders are not firing, you’ll want to start by replacing that individual spark plug wire. You may also be able to fix this problem by replacing the distributor cap or rotor.
4. Check and replace all fluids
The next step in doing a full tune-up of your L-series engine is to replace all relevant fluids. We recommend changing your engine oil, coolant, brake fluid, and clutch fluid. For oil, you may decide to just top off your oil which is acceptable as long as you’re following the Datsun recommended oil change schedule of every 3,000 miles. As for what kind of oil you want, we 10W-30 or 10W-40 is recommended. If you live in a warm climate (Over 90 degrees Farenheit), you may also be able to run 20W-40 or 30W, according to the Datsun factory service manual. Overall, 10W-30 is the most universally recommended. Every 6,000 miles, you should change out your oil filter with an acceptable replacement such as the FRAM PH8A which can be found on Amazon.
Next, you’ll want to replace your coolant, or just top-off if you prefer. Again, since you’re doing a full-tune up, you should probably just replace the coolant at this point. For an L-series, the factory recommends that you only use permanent type antifreeze, that is, ethylene glycol. This is sort of redundant as the vast majority of antifreeze you’ll find on the shelves of any auto-parts store will be permanent. I’ll make it simple — get the green stuff. Also ensure that you are only using one type of antifreeze and that you are not diluting it with water.
Actually changing coolant is fairly straightforward. Just pull out the petcock on the underside of the radiator and catch the coolant with a drainage pan. Make sure you recycle the coolant as it is toxic. However, just draining the coolant only removes about half the actual coolant in the radiator! To remove the rest, you’ll need to flush the system with water. Insert the petcock back underneath the radiator and fill up the radiator with water (be careful of hot fluid when removing radiator cap) until you see the water line coming up. Start your engine and let it run for 10 minutes. Wait for the engine to cool off again and again remove the petcock to drain. You will see that the water is muddled with remnants of the coolant. Repeat this process until the drained water contains very little coolant remnants.
Next up is the brake and clutch fluid. Unless you feel that your brakes or clutch might have some issues, you can get away with just topping off your brake and clutch fluid at this stage. Check out the master cylinder for each of them. The ‘normal’ mark is very clearly indicated and you should just ensure everything is topped up to that level. As always, be careful not to spill any brake fluid inside your engine bay.
At this stage, you might also want to top off your windshield wiper fluid while you’re at it. That is, if your wiper pump still works!
5. Check out your cooling system
While your fuel temperature gauge is likely faulty (most are in the average Z-car), do an initial check to see where it is. Let the engine warm up and see where it settles. It should line up right about midway, so approximately 185 degrees. However, this is not a final test. There is a crude method to supplement this, but it works quite well. Grab an ordinary meat thermometer, and remove your radiator cap (again, be careful of hot radiator fluid!). Stick the meat thermometer in and see what that reading gives you. You will find that this might be far more accurate. If you do encounter issues, going through your cooling system is another intricate process that I’d also rather leave to a great YouTube video. EricTheCarGuy on YouTube has a few great videos on just this subject and while not necessarily all of it pertains to the L-series or the Z-car, he provides a wealth of information on the subject. Check out the video embedded here if you have any cooling issues.
Once that’s done, you’re all set! Of course this is not a comprehensive guide to tuning your Z, it provides a great baseline level of checks so that you can get a good idea of how your L-series is operating and what you might want to look into.