The Datsun Z-series S30 featured a front disc brake and rear drum brake setup. All S30 Z-cars, from the 240Z to the 280Z, came stock with this setup which was all powered by a hydraulic system. Knowing how to repair and replace components of your S30’s brake system, such as replacing your brake pads and rotors, is a critical aspect of Z-car ownership like any other car. This guide will serve as a general overview of the system itself and how it works, along with a detailed overview of replacing your front brake pads and rotors.
Some of the links on ZCarGuide page may be affiliate links, meaning I receive a commission (at no extra cost to you) if you click on the link and make a purchase. I only recommend products I’ve used and trust unless stated otherwise.
General Overview of Brake System
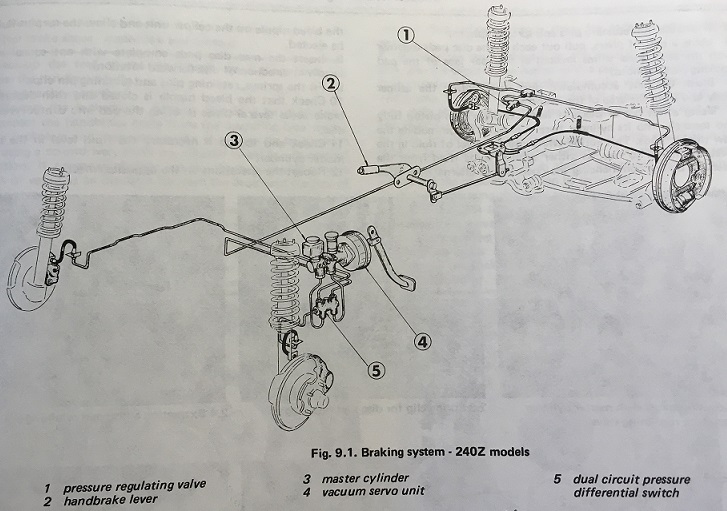
For all models from the 240Z to the 280Z, the braking system is a servo-assisted hydraulic type, with front disc brakes and rear drum brakes. The rear drum brakes are made of finned aluminum with cast-iron liners. The hydraulic system is comprised of two separate circuits (one for front disc, and one for rear drum) which are controlled by a tandem master cylinder. The hydraulic system has a pressure differential warning switch which monitors the difference in pressure between these two circuits along with a general pressure regulation valve that prevents rear brake-lock under heavy brake pedal application.
How to Replace Front Disc Brake Pads and Rotors

Replacing your Z-car’s front brake pads and rotors is actually a pretty simple process that can be done in an afternoon with tools you likely already have. Another reason it’s a good idea to do this kind of job yourself is that you can save a lot on labor that would otherwise be spent at the mechanic.
Brake Pad Removal
- Break free/loosen the front wheel lugnuts with the front-end still on the ground. You will probably need a breaker bar for this, and a few other bolts involved in this job. I also recommend grabbing a can of Liquid Wrench and applying it to all bolts that need to be removed along with the brake hardware holding the brake pads on.
- Next, jack up the front of the car with appropriate jack and two jack stands.
- Block off your rear wheels with some 2x4s to prevent rolling.
- Remove your front wheels. You can slide them under the chassis for additional protection.
- Turn the steering wheel all the way to the opposite of whichever side brake you will be working on first to give you more room to work. As in, if you are starting with the right wheel, turn the steering wheel to the left so that the caliper faces outward.
- Before you do any work on replacing your brake pads, you’ll want to make sure that the brake pads actually need replacing. You can do this now without actually removing anything. Take a vernier caliper (if you don’t already have one, it’s indispensable tool — here’s my favorite brand) and measure the thickness of the abrasive material on the brake pads. If the abrasive material measures 3/32 in. or 2.4mm or less, then it’s time to replace your brake pads.
- The brake pads we are recommending are Hawk Performance HB169F.560. They are a direct replacement and work very well — overall, great value for the money.
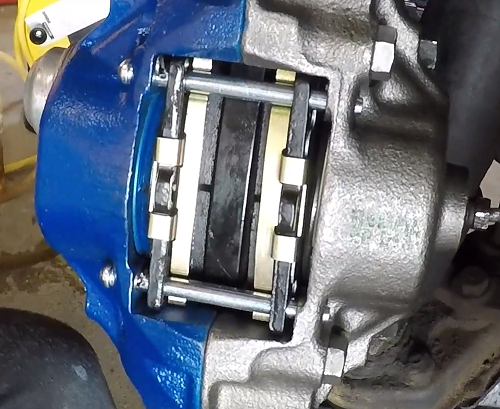
- You will see the head of some spring clips which are holding down the retaining pins. Remove both of the spring clips with a pair of pliers. There will also be some retaining clips that sit on top of the brake pads — they’ll come out when you remove the pins.
- Withdraw the the retaining pins. You can use a small, skinny piece of metal such as a nail to poke the retaining pins through with a hammer.
- Pull out the brake pads along with the anti-squeal shims which will be to the rear of the brake pad backing-plate. You can use your pliers again to grab these two objects at once.
- At this point, you will want to use a brake pad spreader tool to depress the cylinder back.
If you just want to replace your brake pads, you can skip the next few sections and scroll down to ‘Installing New Brake Pads’. However, I suggest also replacing your rotors if you are already replacing your brake pads!
Removing Brake Rotors
With the brake pads removed, if you are also removing the brake rotors, now is the time to do so with the brake pads removed. This will require you to disconnect the brake line, detach the brake caliper, and then remove the wheel hub and finally, the brake rotor.
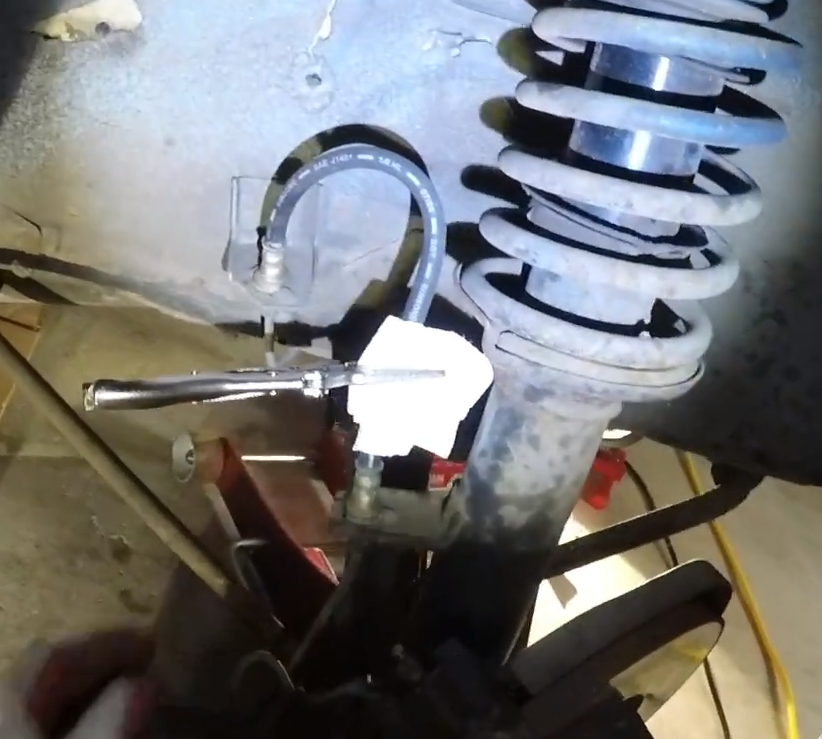
- Before you disconnect the brake line, you will want to minimize the loss of brake fluid that is already in the system, and prevent the introduction of more air into the system. You can do this by locating the rubber brake hose that connects to the metal brake line near your disc brake assembly. Take a set of vice grips and a paper towel, and clamp the rubber hose shut.
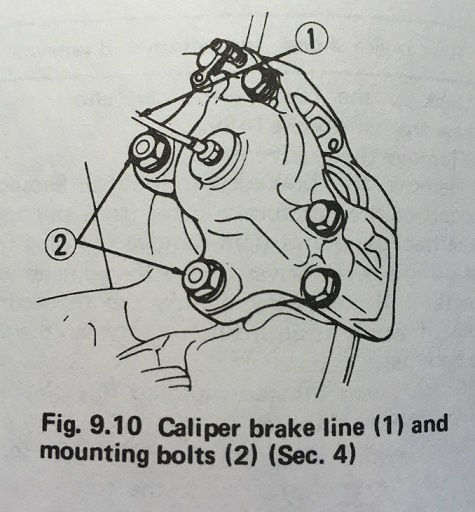
- With the brake hose clamped off, disconnect the brake line connected to the caliper with a 10mm flare nut wrench to ensure you don’t strip the nut which is very possible without a flare nut wrench — a stripped brake line nut would certainly be a day-ruiner for this job.
- Remove the brake caliper mounting bolts (see bolts marked #2 on diagram from Haynes Manual pictured here) with a breaker bar or impact driver.
- Slide the brake line you disconnected earlier out of the way so that you can slide the entire brake caliper off.
- This gives us access to the wheel hub and brake rotors which you are replacing.
- Use a screwdriver and a hammer to tap out the dust cap. It will fall right off, revealing the inner-workings of the wheel hub assembly.
- Straighten and pull out the cotter pin.
- Remove the spindle retainer and spindle nut. The spindle nut should already be pretty loose.
- Remove the washer behind the spindle nut.
- Pull the wheel hub/brake disc assembly towards you, catch the thrustwasher and outer bearing as they will likely fall.
- With the hub/disc assembly removed, remove the four setscrews which fasten the disc to the hub.
Installing New Brake Rotors, Rebuilding Wheel Hubs, and Reinstalling Brake Caliper

The correct brake rotors for the 240Z, 260Z, and 280Z are produced by StopTech. I will link them here so you can purchase, but make sure you are buying a right rotor and a left rotor. They will be indicated with a “L” or “R” at the end of the product name.
- For the 1970-1973 Datsun 240Z, the correct rotors are under the StopTech 127.42011 rotor family: LEFT, RIGHT
- For the 1974-1978 Datsun 260Z/280Z, the correct rotors are under the StopTech 126.42005S rotor family: LEFT, RIGHT
Next, were going to be following the steps in reverse order from the previous section, ‘Removing Brake Rotors’, although I will provide a quick outline of this process in reverse as there are some differences. Liberally use some degreaser to clean off all of the parts that you will be reusing. Don’t worry, we’ll be reapplying some fresh grease to the sliding-contact metal components like the bearing. Make sure you use high-temp wheel-bearing grease such as this brand.
- Apply some anti-seize to the four set-screws, and then use them to re-fasten the wheel hub to your new rotor.
- Apply new grease to the outer bearing and thrustwasher exactly as you removed them.
- Apply new grease to the spindle and push the hub/rotor assembly back onto the spindle, making sure you don’t lose your bearing or thrustwasher.
- Put back the spindle nut, tighten, and reattach a cotter pin, bending one leg to secure it in place.
- Make sure you pack a bit more grease in to this area.
- Lightly hammer the dust cap back on.
- Slide the brake caliper back on, and use a torque wrench to tighten the brake caliper mounting bolts down to 70 ft-lbs of torque.
- Reattach the brake line by sliding it back in place, and using your 10mm flare nut wrench again to tighten it down without stripping the nut.
Installing New Brake Pads
Take your new brake pads (again, we recommend the Hawk Performance pads listed above) and install them with the abrasive material facing the rotor. Slide the top retaining pin through the rotor and both brake pads, and then install both retaining clips. Slide the bottom pin in the same way, just making sure it goes over the retaining clip and holds it all in place. With the retaining pins in place, reinstall the spring clips to fasten the pins down securely.
Bleeding your Brakes
Any time you disconnect part of your brake system (like when we disconnected the brake line from the caliper) you are introducing air into your brake system, and will need to bleed your brakes to flush out that air and water that may also be present. I would also generally recommend bleeding your brakes periodically (every 2 years at least) as water will naturally enter the system over time.
The most conventional method of brake bleeding will require an assistant to pump the brakes for you while you work on the bleeder screw, which will likely have a rubber cap on it which needs to be removed. First, attach some kind of clear tubing to the exposed bleeder screw so your brake fluid doesn’t drip down everywhere while you bleed the brakes, and instead route the tubing into a catch can. Before you begin, top off your brake fluid in the master cylinder. With all that ready, have your assistant sit in the driver’s seat and have them pump the brake pedal a few times. Tell them that there should be resistance. After they pump for a few times, they should hold down the brake pedal as hard as they can until you give them the signal to let up on the pressure. With the pedal held down, you need to loosen the bleeder screw a 1/4 turn, causing a release of brake fluid and air. Your assistant should feel the brake pedal go down to the floor. Only keep the valve open momentarily before re-tightening. Repeat this a few times, keeping an eye on your clear tubing for air bubbles flowing out each time you let some air and brake fluid out. Once you notice that there are no air bubbles being released, you are done. Top off the brake fluid and make sure the pedal feels firm both to the touch and in terms of its responsiveness on the road.