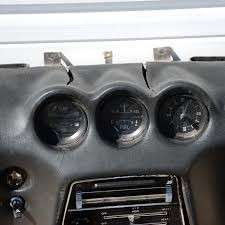
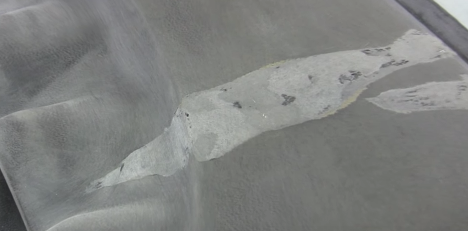
One of the most common ailments of an old Z-car is a cracked dashboard. In fact, most of the unrestored 240Zs, 280Zs, 280ZXs, and 300ZXs you will come in contact with will likely have some form of dashboard damage typically manifesting as a vertical crack across the top of the dashboard. This is especially common in Z-cars that have spent much of their life in a dry, sunny area. Many of the beautiful Z-cars out of the Southwest U.S. have some form of dashboard cracking after spending years baking in the California sun. This is ironic because while dry conditions have preserved these Zs from developing significant rust, the same conditions have led to the cracked dashboard. Fortunately for you, repairing a cracked dashboard is quite simple and far easier than repairing a rusty car! This guide will outline an inexpensive, simple method of repairing your cracked dashboard to significantly improve the cosmetic appearance of your Z-car.
Some of the links on ZCarGuide page may be affiliate links, meaning I receive a commission (at no extra cost to you) if you click on the link and make a purchase. I only recommend products I’ve used and trust unless stated otherwise.
Anatomy of the Dashboard
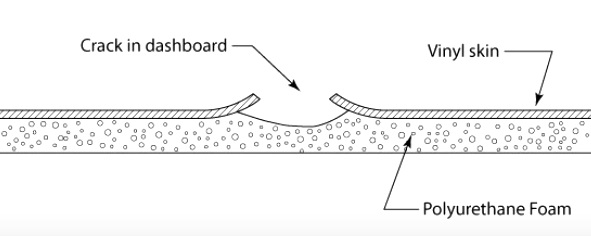
Before you begin repairing your dash, it is helpful to know what materials the dashboard is made out of in a Datsun Z-car. It is a very simple design — there is a base layer of padding in the form of polyurethane foam, and above that, the dash is wrapped in a vinyl skin. When exposed to sun, the vinyl begins to curl up and crack open, particularly in areas where the vinyl does not lie flat. For example, between the analog gauges in the center of the dash is a common spot for dash cracks.
Preparations
Start by cleaning the surface area of the damage and the area surrounding it. Use an aerosol plastic cleaner such as this “Super Prep” brand. Simply spray around this area and wipe the cleaner off with a fresh paper towel. The purpose of this is to remove any silicone dressings that may have been applied to the surface.
Next you’re going to want to grab a Dremel with a drum sanding mandrel attachment like this one. If you don’t already have a Dremel, I highly recommend you consider purchasing one just for this process. Not only will it make your life much easier for this repair, but I consider my Dremel to be one of my most useful tools. On Amazon, the Dremel 4300 offers a great package that includes a starter kit of over 40 accessories, a.k.a. you won’t need to go back to Home Depot every time you want to use the thing for a new job!
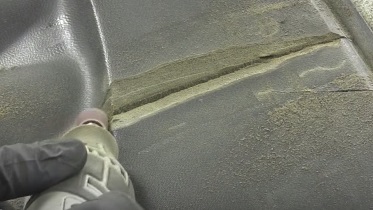
With your Dremel and the drum attachment, begin carving out the vinyl that has peeled up to form a V shape along the crack. Don’t be afraid to sand back and into the foam — in fact, you probably want to do so in order to create the uniform V shape. Sand back, widening the V shape until you reach vinyl which still has a strong connection to the underlying polyurethane foam.

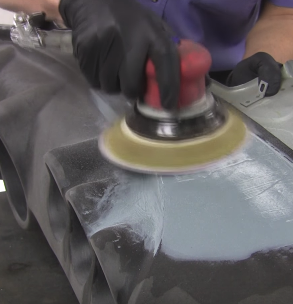
Next, take a rotary (random orbital) sander and bevel out the edges of the V until a decent amount of the vinyl surrounding the original crack line is exposed. Next, you’re going to want to use a combination of a dual-action sander and good-ol’ 80-grit sandpaper by hand to take down the vinyl on the entire surface of the dash. The goal at this point is to take down all edges enough to match our repair area so that our finished product does not stand out — everything will be uniform.
Applying Filler
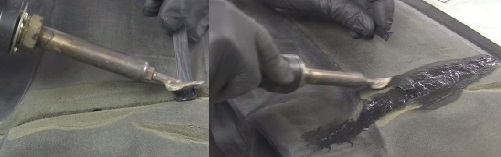
With that done, you’re ready to begin filling in the crack. The material we will be applying to the crack is Polyvance FiberFlex plastic welding material. This material comes as a rod and you will melt it down with a specialized plastic welding tool — similar to how a soldering iron works. You will need a relatively specialized tool to apply this, an airless Mini Weld kit to melt down the FiberFlex welding rod. As you melt down the FiberFlex, it will link into the polyurethane foam and provide a great surface for the filler we will be applying soon. As you begin to completely fill the crack, use the weld kit to spread the FiberFlex outwards and flatly across the surface. See the image below on how to apply the FiberFlex with your weld kit.
Next, wait for the FiberFlex to dry. It should take 15-20 minutes, just touch to ensure it is hard enough to sand down. Grab your dual-action sander again and the 80-grit sandpaper, and sand the repaired surface down flush. If you still have low spots, you can reapply more FiberFlex and sand again to even things out. Repeat until you are happy with the surface.
The next step is to apply the actual dash filler, but first we need to prep the surface for the filler. Use some form of compressed air to blow the dash completely dust-free. Apply a filler-prep to the repair area. You will be applying the dash filler several inches surrounding the crack, not just the crack itself, so be sure to keep that in mind while applying the filler prep.
Now we’re going to apply the filler. Ensure that you are using a padded dash filler such as this one and not your standard automotive filler. Prepare the dash filler by mixing in the cream hardener that comes with it. Mix it like you would bondo filler or any other form of automotive filler — pile it up in the center, spread it across, and repeat. Of course, don’t want too long to apply the filler as you want it to be soft as you apply. You’ll be going through several iterations of this and sanding down after so don’t worry about making it perfect. Again, spread the dash filler a few inches to either side of the original crack damage. You can use your finger to apply the dash filler along the more complex edges to ensure the dash will maintain it’s original shape once we’re done. After the filler dries enough, start sanding with the dual-action sander and by hand with the 80-grit and then 180-grit. You want to end with sanding the entire surface of the dash with the 80-grit and then finalizing with the 180-grit. The goal at this point is to have the filler covering the edges of the vinyl so that they are buried underneath.
Prep and Painting
We’re on the home stretch! Soon your dash will be as good as new. With a final 180-grit sanded surface, apply a coat of Plastic Magic to the entire dashboard. This will help in applying the primer so that it sticks. Next, you’re going to want to apply a waterborne primer, wait for it to dry, and then sand the surface down even with 240-grit and then 320-grit sandpaper. Repeat this process of priming and sanding until you are satisfied with the smoothness of the surface. Make sure you are sanding the entire front-facing surface of the dashboard and not just the repair area to ensure an even appearance of our finished product. Also make sure you blow the area free of dust after doing any sanding.
With the surface ready for paint, you’re going to want to finalize everything with a textured spray to emulate the original appearance of the Datsun 240Z, 280Z, 280ZX, and 300ZX dashboard. A great product for this is Flextex VT which spatters the spray to create that original textured look. This product does not come in an aerosol format, so you’re going to need to borrow a paint-gun if you do not have one, or just purchase one for yourself.
Apply 3 light coats, ensuring that you are moving the gun evenly across the surface and not stopping at any one point. After 3 coats have been applied and given time to dry, the finished product should be even and without areas of Flextex buildup. The finished look of Flextex is nearly identical to the original vinyl-wrapped Z-car dashboard! Re-install your dash and enjoy the significantly improved appearance of your interior.
