As any Z enthusiast knows all too well, rust is the definitive kryptonite factor for any 240Z, 260Z, or 280Z. In the 60s and 70s, automakers did not necessarily galvanize cars or prioritize rust-proofing in any way, and Japanese cars were especially bad in this respect. While not always untrue, any seller claiming they have a “rust-free” 240Z is likely fibbing at least a little bit. In many cases, the seller might not even be aware of rust on their Z car. That is why it is imperative that when looking for a Z car for sale, you meticulously inspect any prospective purchase for rust, especially if the car in question is from a traditionally humid climate. This guide should serve as a guide for how and where to check for rust on a vintage Z Car.
Some of the links on ZCarGuide page may be affiliate links, meaning I receive a commission (at no extra cost to you) if you click on the link and make a purchase. I only recommend products I’ve used and trust unless stated otherwise.
The most important tool in this process is a keen eye for what to look for. Fortunately, if you know where to look, spotting rust is the easy part. Generally, rust will be as clear as day, and most rust under the paint can be spotted by bubbling of the paint due to the oxidation process happening below. In the best case scenario, you might want to get the car up on a lift to check the most common general rust area — the underside. If not, take your time with a flashlight and check out as much as possible.
Rust repair, when done well, is not necessarily a disqualifier for a potential Z car purchase. However, previous rust repair is still something to look for, especially if the seller claims no rust-repair has been done. You can do a cursory check by looking directly down the natural trim/shape lines of the car and looking for any unnatural variation. This is best done in natural light but not direct light – look on a sunny day but in the shade, if possible.
One thing you simply can’t always tell with just a visual check is whether or not rust-repair has been done on the body. A car that has had rust repair done is not necessarily a poor purchase, but if the seller is not upfront about this and you end up discovering rust repair, it should be a major red flag. Similarly, a little bit of rust repair in the regular areas is typically fine, but an extremely high volume of rust repair present on the vehicle should also serve as a warning to you.

The question becomes, how can you actually check for hidden rust repair? While some swear by using a magnet to detect any body filler along the exterior, we at ZCarGuide we recommend using a coating thickness gauge to be sure. Using a gauge, you can simply go over any spot you find suspicious and see if the coating thickness matches up to the rest of the car. It should quickly become apparent whether rust repair has been done on the car. In the past, such a tool was a little too expensive to be considered a necessity, but we find them so useful and can now be found so cheaply on Amazon that we strongly recommend you purchase one before ever looking at a prospective Z-car for sale. The Z-car is simply too rust-prone to not check all the boxes on this issue.
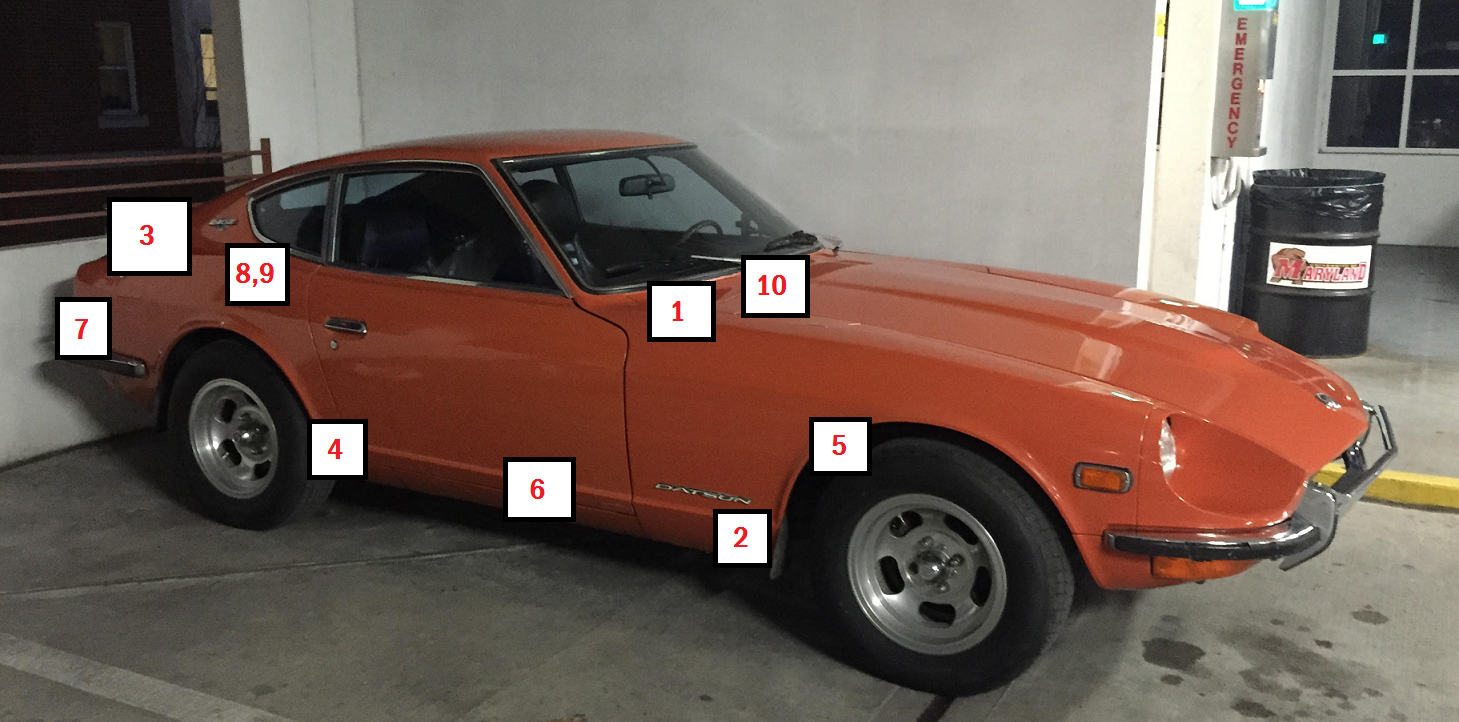
Below are a few common areas to look for rust on your typical Z-Car:
- Under the battery tray – The battery tray is the number one indicator of your overall rust situation. Some cars will have their battery trays completely destroyed by rust, but if you see rust here, take a much closer look at the rest of the car.
- Lower front fenders – Self explanatory, just check for normal rust but beware rusting from the inside out that hasn’t shown yet.
- Rear Hatch – Rainwater tends to roll down and get trapped in a lot of areas here, so be sure to be thorough. Check both mating surfaces and all along the sides. When you inspect the taillights area (see below) you can remove the sidemarkers to see some of the underside damage if you suspect more rust in this area.
- Doglegs – One of the most common trouble areas. Sometimes it is difficult to tell here if it is rusting from the inside, but take a hard look to see if there is any paint bubbling or other signs.
- Wheel wells
- Floorboards – Actually go into the driver and passenger sides and pull up the carpet to look underneath. It will be very clear to you initially whether there is rust, but ensure to check meticulously with a flashlight as this area is by far one of the most notorious rust spots.
- Tail lights – If you can, try to remove the sidemarkers to get a good look inside this rear area to see where rust has accumulated and the extent of the rust.
- Spare tire area – Move the carpet just enough that you can actually remove the spare tire itself to get a really good look here. This areas is one of the most indicative areas of the overall rust situation you are dealing with. This is also a great area to check for original paint color as repaints often don’t cover this area.
- Floor of Rear Hatch – Picture
- All along cowl panel –There is a foam piece inside the cowl panel that tends to soak up moisture and the cowl panel often rusts from the inner compartments outwards.
- Most importantly, ensure you check the entire underside meticulously.