Tuning your Datsun 240Z’s SU Carburetors can be extremely tricky, but when armed with a proper understanding of their functionality, the right tools, and a little patience, you will be able to get them running smoothly and delivering the appropriate amount of power under all engine circumstances. This guide is the last installment of our Datsun 240Z Carburetor Guide, so check that out if you’d like to go back and learn how to prepare your carburetors for tuning by rebuilding, cleaning, and reinstalling them. In particular, I’d highly suggest you at least skim over our write-up on Understanding 240Z SU Carburetors, as the SU carburetor is very unique in its design and the adjustment procedure is unique as a result.
This guide is only applicable to ‘Round Top’ 240Z SU carburetors. Currently, we do not offer specific tuning advice for ‘Flat Top’ SU carbs. The Flat Top carbs are much more difficult to tune and many suggest simply replacing them with their Round Top variants.
Quick note for my readers: some of the links on this page may be affiliate links, meaning I receive a commission (at no extra cost to you) if you click on the link and make a purchase. I only recommend products I’ve used and trust unless stated otherwise. Below you will find some recommended tools and books for this SU carburetor removal process, with corresponding links to these products if you do not have them already.
Preparing for Carburetor Adjustment/Tuning
Although SU carburetors seem to confound even the most experienced mechanics, be careful that you do not mistakenly blame maladjusted carburetors for performance issues before considering all the other areas that need to perform well in order for your carburetors to function properly. Before you jump to concluding that your carburetors are the source of whatever issue it is you are trying to fix, take a look at this list and see if you might want to check one of these areas first:
- Ignition timing
- Spark plug gap level and condition
- Cylinder compression
- Valve clearances
Of these, the most significant is the condition of your spark plugs. To be perfectly honest, you can do a little bit of carburetor adjustment without doing a spark plug replacement, but it will be impossible to tune the carburetors properly if even one of your spark plugs has fouled. So basically, don’t spend too much time on an issue you can’t seem to sort out with your carburetors, before at least checking the condition of your spark plugs. All S30 Z-cars require NGK BP6ES spark plugs, and you can see a complete guide to replacing your spark plugs here.
I’d also suggest you start using ethanol-free gas if you know you’ll be adjusting your carburetors soon. Carburetors simply perform better with ethanol-free gas and you should probably be using ethanol-free all the time, but if you aren’t, just start cycling it in before you tune your carburetors so that your fuel supply will be 100% ethanol-free by the time you get around to tuning the carbs.
Recommended Reading and Tools
Here are a few books and tools I highly recommend if you wish to tune your SU carburetors. You can get by without purchasing the books as most of the important information on adjusting SU carburetors is available here, but the two tools I recommend are absolutely necessary to do this job right, in my opinion. Of course you are going to need a few more commonplace tools such as a flathead screwdriver, but the two listed here are specialized tools for carburetor tuning that you may not have lying around already.
SU Carburetters Tuning Tips and Techniques
This book is extremely helpful in understanding the functional principles behind the SU carburetor. Although it is not specific to the Hitachi SU carburetors seen in the 240Z, the basic design is the same. Of all the SU carburetor books out there (and there are more than you would expect!) this one is the most illuminating as far as understanding the unique design behind the carb. Additionally, it offers some great advice on the tuning procedure listed here and why it works.

Haynes Repair Manual – Datsun 240Z, 260Z, and 280Z
The Haynes manual is the go-to guide for any work I do on my 240Z. This is a great book to have on hand in the garage for carburetor tuning because it offers some very helpful diagrams for a lot of confusing concepts. It also offers some great pictures but hopefuly I’ve included enough here that that won’t be all that necessary. Overall though, if you plan to do any work on your S30 Z-car, the Haynes manual is indispensable.

The Gunson Colortune is a relatively unknown diagnostic tool that is almost vital in tuning SU carburetors. When I was writing this guide, I contacted the most experienced 240Z mechanics I know of and they all swore by use of the Colortune to get the mixture right. I bought one myself and it made the entire process much more straightforward, and everything made a whole lot more sense. It is certainly possible to tune these carburetors without the use of a Colortune, but the Colortune makes adjusting the mixture a much easier process. I consider this a required tool if you want to do the job correctly. The linked Colortune product comes with the standard 14mm attachment meaning it is ready for use with the 240Z right out of the box.

Unisyn Carburetor Synchronizer
A Unisyn, also referred to as a ‘flowmeter’ is a very simple and inexpensive device that will allow you to measure the airflow into your carburetors. This is useful because in tuning the carburetors we will need to determine equal airflow between the two of them at idle and at higher RPM levels. If you don’t have a Unisyn on hand, ask around as most at-home mechanics will have one you can borrow, or just buy one on Amazon as they are pretty cheap.

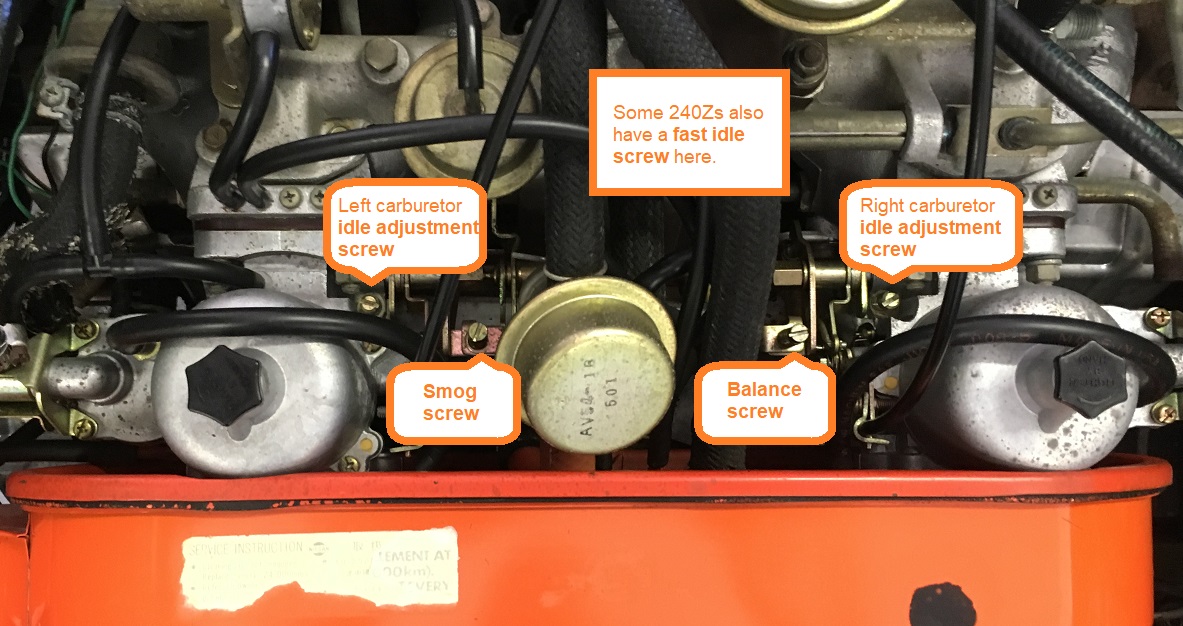
A Note on Mixture Screws

Having read through quite a few different books on the subject of SU carburetors, it seems like some of the terminology on turning the mixture screw can be confusing. This is probably because while working on the carburetors from above, you are actually looking a the mixture screw upside-down, so some people seem to get mixed up between whether they should be turning clockwise or counterclockwise. To avoid any confusion with this guide, I made a simple chart you can see here that will hopefully make things easier to understand! I will refer to mixture adjustments as “turning UP/DOWN the jet” or “RICHENING/WEAKENING the mixture” instead of using clockwise/counterclockwise at any point to avoid any confusion. If you forget, just take a look at the chart here and the associated arrows to determine the direction you should be turning the mixture screw.
For readers who are just reading this tuning guide: it is important to also understand what these screws are doing. One important principle of design with these SU carburetors is the ‘variable jet’ functionality. This means that the jet can sit at different heights depending on the setting of the mixture screw and the level of choke applied to the carburetors. Because the needle is tapered, a recessed jet will produce a richer mixture as more fuel can flow past the needle. When we are adjusting the mixture screws, we are literally moving the jet up or down. You will see this in action in the next section.
Adjustment/Tuning Procedure
For all of the instructions below, refer to the chart here. There are only a handful of screws you will be adjusting, but sometimes the terminology is so similar that it is easy to get confused.
- Remove the air cleaner. For more information on how to do this, see this guide.
- Warm the engine up to its normal operating temperature, then switch it off.
- Disconnect the choke cables.
- For both carburetors, locate its throttle adjustment screw. Back both screws off until both of them are just barely free of its stop plate. Then, screw each one back in exactly 1.5 turns.
- Find the fast idle throttle adjustment screw located on the linkage between the two carburetors. Completely back it off so it is not interacting at all with the stop plate.
- Also back off the balance screw (located on the right side of the linkage).
- Using your finger and a flashlight, lift up the suction piston and take note of the position of the jet. If you can’t get a good look at it, a good trick is to turn on your phone’s video camera with flash, and record a video of it while you hold up the suction piston.
- Adjust the mixture screw until the jet is completely flush with the bridge of the carburetor. With most carburetors, this is usually when the mixture screw is turned completely up.
- From this top point, turn down the mixture screw/jet by exactly two turns.
- Restart the engine.
- Adjust the individual carburetor throttle adjustment screws (not the fast idle screw on the linkage!) evenly until the engine runs relatively smoothly at around 700-800 RPM.
- Now we’re going to sync the carburetors: Grab your Unisyn and rotate the index of the Unisyn until the front carburetor reads right in the middle of the flow gauge.
- Adjust the rear carburetor throttle adjustment screw until the flow level registers as the same as the front carburetor on the Unisyn.
- Familiarize yourself with the functionality of the Colortune with the section below titled ‘Use of Colortune’.
- Set up the Colortune on piston #4 (ordering pistons in this case from rear to front). This corresponds to the front carburetor.
- Adjust the mixture screw on the front carburetor until the Colortune shows a ‘bunsen blue’ color.
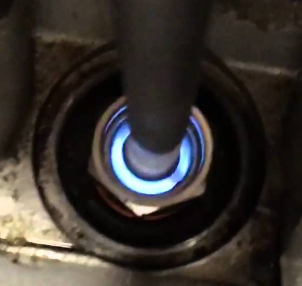
This is the ‘Bunsen blue’ color that indicates a chemically optimal air-fuel ratio on the Gunson Colortune. - Set up the Colortune on piston #2. This corresponds to the rear carburetor.
- Adjust the mixture screw on the rear carburetor until the Colortune shows that same bunsen blue color.
- Adjust the balance screw so that the both suction pistons inside the carburetors appear to rise simultaneously with the throttle.
- To check your work, use the fast idle screw to raise the idle to 1200 RPM. Use the flowmeter again and ensure they still register at the same level of flow.
- As another check, rev the engine a few times and make sure the carburetors are still synced after that. Any differences at this point and you should repeat this process at step 11.
- Go into the car and set the variable choke control such that it is about half an inch away from the ‘full choke’ setting.
- Reconnect the choke cables at their absolute highest point. That is, pull the choke control on the carburetor up and towards you so that it cannot pull the mixture jet down anymore. Reconnect the choke cables at that point and be sure to screw them down securely so they do not slip.
A few notes on this procedure
- The correct ‘bunsen blue’ color of the Colortune can actually correspond to either a chemically correct or perhaps slightly lean mixture — the difference is very slight. If you are noticing some issues with backfiring or loss of power at this point, it is maybe because your mixture is on the leaner side of this spectrum. Richening the mixture (while ensuring it still registers in this ‘bunsen blue’ territory) may fix this. However, if you are noticing those kinds of issues, you’ll also want to make sure that they aren’t being caused by a vacuum leak which we will discuss later in this guide.
- This guide suggests 700-800 RPM as a good idle. While you may feel comfortable with a higher idle (on a 240Z I personally prefer an idle closer to 1000 RPM) you should be tuning at this 700-800 RPM level at a baseline just to make sure you can actually set them that low. If your carburetors still have underlying issues such as a vacuum leak, you might not even be able to get them to idle and sync that low. This way, you can rule out that as being a ‘false positive’.
Use of Colortune
The Colortune assembly is very simple to set up but I found the instructions included with the tool to be pretty unclear when it came to assembling the Colortune. Below is an image of the Colortune assembled — you don’t need all the parts for the 240Z. You will see that you need the Colortune plug itself, with the gas seal washer on, and the extension lead attached to the other end.

I recommend first inserting the Colortune plug with the washer. You can make threading it in easier by using the smaller half of the plastic Viewerscope that came with the Colortune. However, only ever insert and tighten the Colortune by hand. You can switch over to a regular spark plug deep socket after it is threaded in all the way, but still only tighten by hand. After the plug is inserted and securely tightened, screw on the extension lead. At this point you can attach use the spark plug wire. It wont snap on, but as long as the extension and the plug wires are contacting, it will work.
Another note is that you should only be running the engine while using the Colortune for a few minutes before shutting off the engine.
Finally, here’s how you should be interpreting the color:
- Yellow indicates a rich mixture.
- Bunsen Blue indicates a correct mixture, but can also indicate a slightly lean mixture.
- Whitish Blue indicates a lean mixture

Checking for Vacuum Leaks
Because the air-fuel ratio is such a precisely controlled statistic within an SU carburetor, it is no surprise that any change of pressure via a worn gasket or loose bolt can be disastrous for the performance of your SU carburetors. This is known as a vacuum leak — a loss of vacuum somewhere within the carburetor or intake that is affecting your air-fuel ratio. Vacuum leaks can lead to a lot of difficulty synchronizing your carburetors, controlling the mixture, or a high idle, or a combination of these issues.
Checking for vacuum leaks is actually a very simple process. You will need some aerosol starting fluid. Simply look and listen for areas on your carburetor and intake manifold that may be letting air in, such as any gaskets. Spray the starting fluid directly on the spot you feel may be causing issues, and you will immediately notice a significant rise in engine RPM. This can be explained by the increased volatility of the starting fluid being sucked in through the leak, therefore increasing the revs instantly.
Areas to check for vacuum leaks include:
- The interface between the carburetor suction chamber bell housing and the carburetor body. Note that there is not supposed to be a gasket here, but still check to see if it is tightened down and no leaks occur.
- Where the carburetor meets the intake manifold. Each carburetor has a gasket and a large spacer, both of which can be the source of vacuum leaks.